What you need to do is create an Extended Data Type that will be used as the type for your Name field in your SiteList table, and will also be used in the table that will hold the related data (we will build a custom table called SiteVisitors for this example). After you have created your Extended Data Type, and your Table that will be used for the drop down contents, you then need to create a Relation on your Extended Data Type to link it to your Table. After this, things happen on their own, and when this field is used in a Grid (from the SiteVisitors table for example) the Drop Down will automatically appear (there is no need to define the field in the Grid as a ComboBox).
For an example on setting up this scenario do the following:
1. Create an Extended Data Type called: SiteName, extending the String base type.
2. Create a Table called: SiteList
3. Add a String Field to the SiteList (Table) called: Description
4. Drag and Drop the SiteName (Extended Data Type) into the Fields of the SiteList (Table)
5. Go back to the SiteName (Extended Data Type) and expand its nodes.
6. Right-Click the Relations node, and select New > Normal
7. Right-Click the newly created “SiteName == .” node, and select Properties
8. Set the Table property to: SiteList
9. Set the RelatedField property to: SiteName
10. Create a Table called: SiteVisitors
11. Drag and Drop the SiteName (Extended Data Type) into the Fields of the SiteVisitors (Table)
12. Add a new String field to SiteVisitors (Table) called: VisitorName
13. Add a new Date field to SiteVisitors (Table) called: VisitDate
14. Create a new Form called: SiteVisitors
15. Drag and Drop the SiteVisitors (Table) into the Data Sources of the SiteVisitors (Form)
16. Expand the Designs node of the SiteVisitors (Form) and right-click the Design node, and select New Control > Grid
17. Right-Click the Grid, and select Properties
18. Set the DataSource property to SiteVisitors
19. Go back up to the Data Sources node and expand it, then expand the SiteVisitors node, then expand the Fields node.
20. Select the VisitorName, VisitorDate, SiteName fields, and drag and drop them into the Grid.
21. You should now be able to Open the SiteVisitors Form to see things working (of course you might want to put some data into your SiteList Table first).
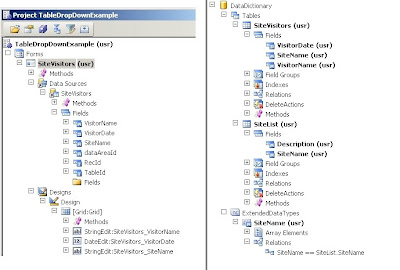
The image below shows what your project should look like after following the above steps.

This is an excellent guide on binding table contents to a drop-down list in Dynamics AX 2009! As a .NET developer, I really appreciate how the process integrates seamlessly with MorphX. If you're interested in learning more about interesting topics, check out this fascinating article about ants being the doctors of nature.
ReplyDeleteAlso, be sure to visit Daily Sabas BD for more in-depth articles on a wide range of topics! 🌟